React生命周期

不过多理解一次,记忆反正深刻吗。
下面这些过时的生命周期方法就舍弃了(老实说当时第一版Mysite项目我还常用这些过时的。。。) componentWillMount()
componentWillReceiveProps()
componentWillUpdate()
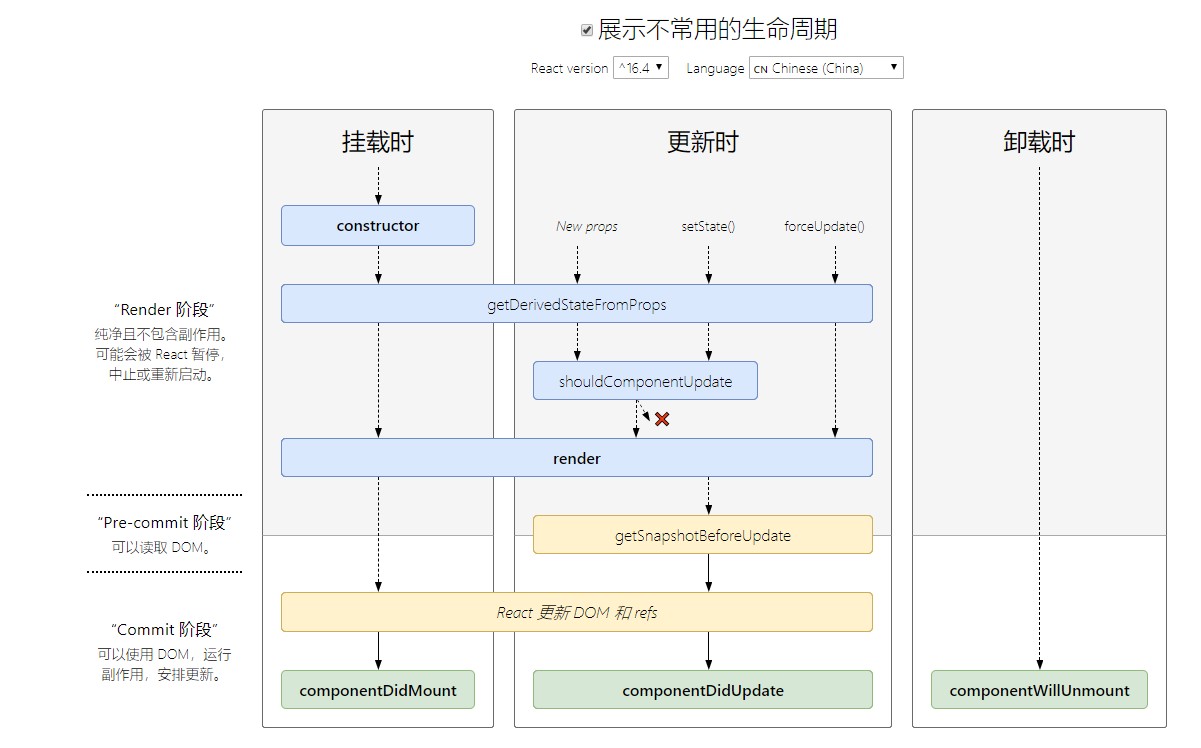
官方图:

各个生命周期的解释请参考 官网文档
下面我们对这张图的每个周期列举到组件代码中,依旧还是用最简单的代码+console.log大法来理解这张图。
- 1
- 2
- 3
- 4
- 5
- 6
- 7
- 8
- 9
- 10
- 11
- 12
- 13
- 14
- 15
- 16
- 17
- 18
- 19
- 20
- 21
- 22
- 23
- 24
- 25
- 26
- 27
- 28
- 29
- 30
- 31
- 32
- 33
- 34
- 35
- 36
- 37
- 38
- 39
- 40
- 41
- 42
- 43
- 44
- 45
- 46
- 47
- 48
- 49
- 50
- 51
- 52
- 53
- 54
- 55
- 56
- 57
- 58
- 59
- 60
- 61
- 62
- 63
- 64
- 65
- 66
- 67
- 68
- 69
- 70
- 71
- 72
- 73
- 74
- 75
- 76
- 77
- 78
- 79
- 80
- 81
- 82
- 83
- 84
- 85
- 86
- 87
- 88
- 89
import React from 'react';
class Parent extends React.Component {
  constructor(props) {
    super(props)
    this.state = {
      pcount: 0,
      key: 1
    }
  }
  add = () => {
    this.setState((state) => {
      return { pcount: state.pcount + 1 };
    })
  }
  unmountLifecycle = () => {
    this.setState((state) => {
      return { key: state.key + 1 };
    })
  }
  render() {
    return (
      <div>
        <Lifecycle pcount={this.state.pcount} key={this.state.key}></Lifecycle>
        <button onClick={this.add}>点击父元素属性变化pcount+1</button>
        <button onClick={this.unmountLifecycle}>点击卸载子组件</button>
      </div>
    );
  }
}

class Lifecycle extends React.Component {
  constructor(props) {
    console.log("constructor")
    super(props)
    this.state = { count: 0 }
  }
  componentDidMount() {
    // this.Interval_id = setInterval(() => {
    //   this.setState((state) => {
    //     return { count: state.count + 1 };
    //   })
    // }, 1000)
    console.log("componentDidMount")
  }
  static getDerivedStateFromProps(props, state) {
    console.log("1--getDerivedStateFromProps")
    return null
    // 此方法返回一个 state render前必然调用
    // 可以用来让props.pcount
    // return {count:props.pcount}
  }
  shouldComponentUpdate(nextProps, nextState) {
    console.log("2--shouldComponentUpdate", nextProps, nextState)
    return true
  }
  getSnapshotBeforeUpdate(prevProps, prevState) {
    console.log("3--getSnapshotBeforeUpdate",prevProps, prevState)
    //这个snapshot返回值会作为componentDidUpdate的第三个参数
    return "snapshot"
  }
  componentDidUpdate(prevProps, prevState, snapshot) {
    console.log("4--componentDidUpdate", prevProps, prevState, snapshot)
  }
  componentWillUnmount() {
    // clearInterval(this.Interval_id)
    console.log("componentWillUnmount")
  }
  add = () => {
    this.setState((state) => {
      return { count: state.count + 1 };
    })
  }
  render() {
    console.log("render")
    return (
      <div>
        <div>
          count:{this.state.count}
          <button onClick={this.add}>子组件count+1</button>
        </div>
        <div>
          pcount:{this.props.pcount}
        </div>
      </div>
    );
  }
}
export default Parent
(完)
0条看法
最新最后最热
等待你的评论


